Thursday, August 29, 2013

And we're BACK!

Don't you love it when you step away from your table at a restaurant for a moment, and return to find your food has arrived and is waiting for you to enjoy? I had the same feeling when I dropped the vovorine off at the paint and body shop before skipping town on vacation. You all saw the "before" pictures in the last installment of this blag. You have been following along haven't you? Haven't you??

Anyhow, here's the "after":
Shiny New Paint!

The body work is done! The paint work is done! Now all I have to do is re-assemble it, right? Right. Wrong. Now I have to rebuild all the stuff that isn't the seats. Let's dig in, but forego any particular aim or order, 'cause that way it can take longer.

Step 1: Dat Dash

I'm not gonna lie. This is a damn expensive project car for a cheapskate like me. I splurged on the seats and suspension elements. I'm gonna cheap out on the dash. Thankfully, JC Whitney carries more than just LED washer nozzles. They stock the Palco ABS dash covers (based right over the hill there in Stead, NV!) which almost fit perfectly and almost look wonderful for almost a bargain! Hey, they had me at "free shipping." Installation wasn't too tricky with the front window out. Aside from a minor kerfuffle on the drivers side of the complex lower dash, the new covers fit excellently and feel quite nice for cheap ABS plastic. I removed the vent trim pieces and reinstalled them over the new cover, so from the top, from a distance, if you squint just right, it looks like a pristine factory dashboard! At least as long as you only look at the passenger side. We'll see how well they hold up in the long run. Fingers crossed!
Shiny New Dash!
I'll be using the same type of covers for the arm rests and door caps, expect more when I get around to building the interior panels (you are gonna read all of my posts, right?). Also, as you can tell, this is not a frame-up restoration. There isn't enough body rust to justify that sort of effort. Plus I'm lazy. And I'm cheap.

Step 2: Dat Glass

Before the paint I had thought to myself "Self, this rubber is crap. Rip it all out, paint the naked body, then put it all back in." After hours of prying, cutting, ripping, sweating, cursing, and cracking, I wrung pre-paint me's scrawny little neck for that suggestion. First off, old rubber is hard. It's like cutting into the plastic on that crappy laptop your kids gave you cause they didn't want it taking up space in their house anymore (hi mom!). Second, old sealants are hard. Like chipping away at, I dunno, a puddle of nail polish your kids spilled in your drawer and hid until forty five years later (hi mom!).

The side windows and rear window came out without much drama. The front windscreen loosened slightly and promptly cracked. Oh well, at least they're still available, and I did save all that money on the dash covers...

Anyhow, the re-install steps are pretty straight forward. Attach gasket to glass, run a line of cord along the gasket lip, set glass/gasket into openening, pull cord. Making these steps work is a bit of a challege starting with "install the window in the right gasket" and ending with "how the hell do you put on the trim strip anyway?!" Thanks to the 1800 Yahoo group, I found out the the reason I couldn't install my quarter panel windows was that they are indeed not flat and can't be swapped side to side (something the lady had hinted at, and I had promptly ignored). Putting everything back together will take far longer than pulling it apart. At this point, I at least have gaskets on all the glass and the side windows are installed. I did manage to pry the old stainless trim back on to the rear window. With any luck the brand new trim I picked up for the windshield will go on easier.
Shiny New Seals!

Oh yes, the door seals are also in and so far are about the only thing to go in smooth! Window channel felts are coming up, perhaps I'll do those the next evening I can talk the missus into crawling back in and chipping away at tar.

Step 3: Steering and Shifting

Maybe you remember the old pictures of the steering wheel (You have read all of my posts, RIGHT?!!). From the factory it's a lovely two-spoke stainless wheel with a thin plastic grip. Time and the dry air has taken it's toll on that grip. Gaps appear at random throughout, and no amount of scrubbing seems to get rid of that rough grimy texture on the backside. Time to sweep it all under the rug. In the spirit of my cheap dash repair, we'll simply cover up the problem with a luxurious leather wrap! The wrap is a Wheelskin purchased through IPD, and graciously (and expertly, I might add) laced on by my lovely, brilliant, kind (did I say lovely?) girlfriend. All done while killing it watching Jeapordy (Trebek, if you're reading this, we're still waiting to hear back on her online test!). Meanwhile I was banished to the garage to polish up the horn button and center trim because: 1) I'm terrible at trivia, and 2) My metal polish stinks something awful.
Shiny New Wheel Cover!

Sort of happening in the background of everything else, we've been sanding, polishing, and dipping the shift knob in a puddle of clear stain. It's really held up quite well to its abuse, but good gods does it soak up a lot of stain. The wooden shift knob is one of my favorite parts of the car. It goes something like this: Round headlights, shiny gauges, stainless grille, shift knob. I'm easy to please.
Shiny Old Shift Knob!


Coming up!

Also in various stages of work are building new door panels and cleaning out the old roofing-underlayment type sound damping from the floors and walls. I'll be laying in some new high-tech stuff before buttoning everything up. Stay tuned! You are going to stay tuned... Aren't you?

Wednesday, August 7, 2013

Ghost in the Shell

Restoring a car is a lot of work. I was expecting to turn some wrenches, pry off some trims, dip it in a puddle o paint, and then slap it all back together. That's still the gist of the effort, but the sheer number of wrench turns and trim prying boggles the mind. That, and apparently I'm terrible at time estimation (I'll have it done, five, ten minutes tops!). In any case, after gutting the interior, I sent the Vovorine off to my good friends at Classic Restorations (in Verdi!!!) to deal with that problematic bump in the trunk.
Ew, gross!
Much Better

It's All In The Details

The trunk work is just the teaser. Now it's time to get nekkid for the paint work. Every conceivable piece of rubber, glass, plastic and steel on the outside of the car comes off. I budgeted a weekend and an extra after work day or two to do this project. I spent two weekends and the majority of the week in between doing it. Oy.

Don't Bend It!


The car is trimmed out in stainless steel. For the most part it's a thin and delicate metal, to be treated with the same care and precision as you would the Queen's new grandson. I of course ripped it out like The Hulk - except for where The Hulk is green and supremely strong, I am not. Speaking of supremely strong, though, the front grill is a mesh of fairly substantial stainless steel rods.
Solid.

Blinkety Blink

With the windows and stainless bits off, it's time to get down to the electrical bits. Being Lucas, I expected to find barrel plugs with mismatched metals all over the place. Alas, it was not to be. Instead I found a solid wire from inside the headlamp bucket all the way back to the source, and of course no way to pull out the buckets (or hide them inside the fender) without removing the cable. Curses. Sounds like something Future John will be able to take care of. We'll just snip it apart with some tree loppers and try to catch the blinker fluid before it all evaporates. Oddly enough, the tail lights and signals did have convenient barrel plugs...
Ow! My eye!

Finishing Touches

Finally, remove the door seals, kick plates, wiper posts, washer nozzles.. The old rusty trunk lid gets replaced with a slightly less rusty trunk lid picked up at the Davis VCOA meet and we're all ready for the paint shop!
...Goodbye cruel world

See you in a few weeks!

Monday, July 8, 2013

Guttin'

It's been a bit since I've written, but that's not for lack of progress. It's just that I'm juggling the remaining tasks while not getting any actually completed. The motor works. The transmission works. That crazy electric overdrive thingiemajigger works. If you don't count the questionable brakes and shot suspension bearings, I have a functioning car! Now I just need to turn it into something my lovely girlfriend would be happy to ride in. Which leads to the final countdown: rust repair, paint, and interior. At some point I'll do one more post about the stereo setup, but let's not get ahead of ourselves. First up, interior.

You've seen the starting pictures (and if you haven't, go read the old posts, you lazy bastage). Crusty dark blue skin that used to be vinyl barely clinging on over a foam that has long since turned to a pale orange powder. Gross. So to start with, let's rip the shit out of it.

Something was definitely living back there...


Interesting how much plywood you find in an old car. At least it's easy to replace... The shelf in the rear is a pair of plywood sheets screwed to a bit of a hinge. The rear seat-back is built on a piece of plywood. I'm told the headliner is stretched across a wooden frame. Strange, nowadays the only "wood" in a car is the veneer trim put there to look classy. If a car's measure of class is the amount of dead tree in it, mine wins hands down!

Speaking of which, let's pull the doors apart while we're at it...


The mechanicals in the doors are all in good working order. I'll give them a decent cleaning and lubing, then stuff the doors with vibration damper and Thinsulate Acoustic before wrapping them back up again and burying them behind the door panels. All of the interior panels are simply flat pieces of fiberboard with some vinyl stretched across. I'll see if I can pull that off myself, wish me luck. I'll be using generous amounts of sound deadener before I reassemble - I want this car to be better than new. The wheel humps look to be two pieces of vinyl stitched in a curve, maybe I'll exchange stitching new wheel humps for some fine beer (any stitchers feel like taking me up on that?). My cheap-o carpet kit might be an object lesson in why not to get cheap-o carpet kits, but I won't know that until I get to em.

But Wait, There's More!!


I picked up my seats from Classic Restorations in Verdi Nevada, and they are looking great! They're refinished in leather for all the parts that matter, vinyl on the rest. The back seats are vinyl as well, but only Isis the dog and stinky children sit back there anyway, so who really cares if it's not perfect? New foam, new elastic webbing, and cleaned up mechanicals. They're looking and feeling great. I'll need to replace the rear seat webbing, but I'll burn that bridge when I get there.
So fresh and so clean!
Isis goes here.
(or more likely, on the top with the seat folded down)

We're getting down to the last few tasks, but it feels like there's still so much left to do!

Wednesday, May 15, 2013

On the Road, Again!

Well boys and girls, I couldn't resist any longer. After a quick bath to wash the garage dust off of the car, I decided to take the Volvorine for a quick little putt putt around the block, and putt putt she did, successfully making the journey and safely returned to the garage without losing any important bits!

They see me rollin'

They hatin'

This little adventure taught me a few things that need seeing to:

  • The left turn backing out of the garage dumped a bunch of washing water out of the heater box into the passenger footwell. The immediate right turn down the road dumped the rest of it onto my shoe. Will need to investigate that drain hose and seals
  • The accelerator pedal doesn't seem to move the throttles until it's halfway to the floor. Time to replace bushings on the throttle linkage.
  • Idle was almost entirely controlled with the choke. I really need to get to that carb tuning...
But, there was even more good news, showing I'm closer to the end than the start!
  • The brakes are solid enough to get me to the DMV for title and registration (will be even more soliderer with some bleeding)
  • The speedometer, while bouncy, at least provides some vague indication of my forward progress
  • First through third gears spin splendidly.

The Short List

This brings me to my short list to wrap up mechanical work and make the car ready for it's trip to the body shop. As always, I may find good news or bad news, so the situation will remain fluid, but at least I can put together a checklist to start marking things off!
  • Rewire the ignition coil back through the tachometer. Seriously, I want to know why the last guy moved it to a single screw hanging off the engine block.
  • Adjust the throttle linkage to give some semblance of a link between what happens at the accelerator pedal and what happens at the carbs.
  • Set the timing and tune the carbs.
  • Put more bullet points into my blog.

So, spose it's time to dig up some insurance and get ready to check out some body shops. Now, more road candy for my adoring fans:

I'm all out of captions. Let's go for a drive!

Thursday, May 2, 2013

IPD's 50th Anniversary

IPD USA turns 50 this year. To celebrate they're giving away a bunch of money and parts for our car projects.

I don't know about you, but I think they missed the boat on this one for their sponsored vintage project...


Oh well, Happy Half Century IPD!

Wednesday, May 1, 2013

The Story Till Now, Part III: Shinies

One of the draws to this car is the glorious dashboard with six individual chromed brass gauges. Seriously, it's a work of art that you simply do not see these days. Unfortunately, as you've previously read (you *have* been following along, haven't you?), my shiny chrome gauges were anything but, coated in however many years of dust and some sort of green corrosion. From left to right in there we have a tachometer, temperature gauges, speedometer, fuel level, oil pressure, and clock.
You've seen this before...

Step 1 - Polish the Bits:

With the right tools it turns out polishing up the old gauges is really quite easy. To start with, I gave them a quick scrubbing with some 409 (careful not to get any cleaner or water inside, who knows the havoc that would be wreaked) to get some of the surface crap off. After that, it was copious amounts of quality time with the dremel and a polishing wheel. One more trick: after cleaning, rub some baby oil into the faces to minimize cracks and really make them glisten. Oh, you want before and after pictures?
Old and Busted.
New Hotness.

Yeah, they clean up nice. While somebody more knowledgeable than I in the metallurgic arts could go into details as to why, I'll chalk this one up to them not being made of chromed plastic. Now to figure out what works and what doesn't. Thanks to some wonderful help on the Yahoo Groups 1800 list, I was able to repair the clock (more on that later), and the oil and fuel gauges worked out of the box. The tachometer was bypassed sometime in the past when an aftermarket ignition coil was installed in a wonky location. The speedometer might work, I'll find out when I can get the car up to speed (or when I chase down the cable and hook it up to the drill). Temperature gauges are a different story, being detached from their usual locations in the engine bay. I suppose I'll just have to be careful and I dunno... drive in the cold for the time being.
Shiny!

Keeping Time

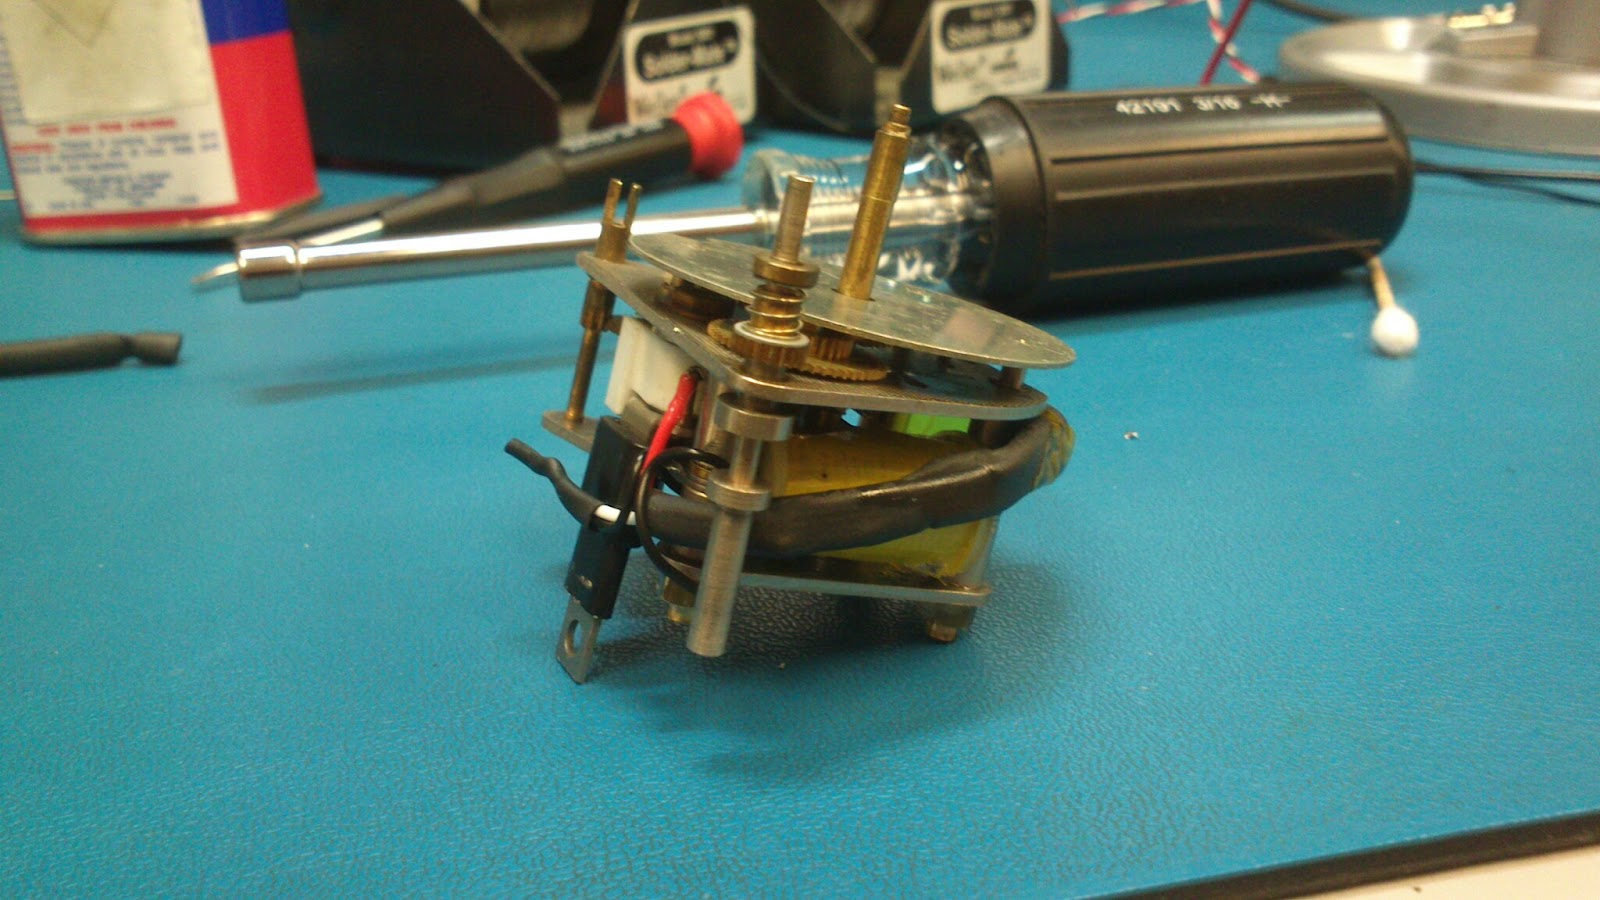
It seems these clocks never work longer than a year or two. Rather than a quartz controlled device, they are a finely balanced electromechanically driven mechanism requiring the near perfect function of some very fine parts. As they say: they don't make them like they used to... And there's probably good reason for that... However, these clocks are just too cool for me to let die an inglamorous death, forever stuck at 3:26, a gorgeous but non functioning relic of the past. Luckily for us, an intrepid member of the community sorted out the root cause of the clock failures and rigged up a solution! Armed with this new knowledge and a full bin of electronic parts from EE 201 a decade ago, it was time to dig in!

First hurdle: These clocks are not designed to be opened. The bezel is literally bent around the backside to hold the thing together. Thirty minutes of savage twisting with a screwdriver freed the clock from it's shiny confines and gave me these beautiful guts:
Brass Clock Guts

The root cause of these clock failures is a a reciprocating balance wheel driven by an electromagnet. To discharge the magnet's capacitor, a fine wiper sweeps brushes against a contact, closing the circuit and allowing the balance wheel to change direction. The above description is more or less entirely inaccurate, but the gist of it remains: too much current through too small a contact in too short a time. To resolve this, a transistor circuit is added. In this setup, the transistor basically works as a relay allowing the wiper to draw a tiny fraction of the current it used to, with the transistor sinking the rest of it. Two resistors, a transistor, and some wires are all it takes (extra special thanks to Bill Jackson of the Yahoo group for drawing this up!).

Circuit Wired In

Only time will tell if it keeps time (hehe, I slay myself), but the clock has been running without issue since installing it two months ago.


Now I just need to put them all back together...
Remember, don't let this guy near any power tools.

Fuel and Air

There's one more installment in the story 'till now, but first let's cover some recent events. I just completed my first carburetor rebuild. It took a bit over a month to get all the parts (don't cheap out on knock-off rebuild kits, boys and girls), but they're done and they work!

The SU Carburetor

The carburetor has just one job: Mix fuel with the air that's being sucked into the engine. This involves four basic functions: interfacing with the fuel system (float bowls), metering the amount of fuel that goes into the air (needles and jets), ensuring the right amount of air/fuel mixture gets in to the engine (throttle), and providing a means to enrich the fuel mixture so the motor can start when cold (choke). I suppose there are endless ways to skin that cat and I'm sure I'll learn another way when I dig in to the dual Bing carburetors on my Airhead motorbike. It took some reading and perusing of the youtubes to demystify these little devices. From the outside, they are a chunk of metal with all sorts of tubes, springs, and appendages attached. I'll be honest, digging into them terrified me.
My Carbs After Rebuilding

Then I did some reading into how they work. Anybody with an old British import may be familiar with these little devices. They were designed back in the stone age by a company called Skinner's Union, then slowly refined a little at a time. The result is an extremely elegent and rugged design with few moving parts or delicate wear items. In essence, there is one moving part for each of the carburetor functions above.

In the float bowls, a plastic float opens and closes a needle valve to provide fuel to the system.

The fuel mixture is determined by raising or lowering a tapered needle in the fuel jet. For me, this is the most fascinating part of the design. The needle is at the bottom of a piston which moves up and down based on how much vacuum the engine is producing. More engine vacuum pulls up the piston, increasing the area the air can flow through while the taper on the needle increases the amount of fuel that can join it. The moving piston keeps a constant air velocity across the fuel jet, allowing the precisely tapered needle to accurately meter the amount of fuel it lets in.

Airflow to the engine is controlled via a standard throttle butterfly just downwind of the vacuum pistons.

Cold starting is achieved by both lowering the jets (so they interface with a narrower part of the tapered needle) to increase the fuel flow and slightly opening the throttles.

Rebuilding

Originally, I had picked up a set of Walker carb rebuild kits from Amazon, because, y'know, I'm cheap. After a few weeks of waiting for the back-ordered kits, I dug in to them. Dismantling the carbs starts with the piston covers (also called "dashpots" because British people are cheeky). Pull off the dashpots, catch the spring before it bounces away, pull out the pistons (careful of those needles!!) and dump out the old oil. Now a couple of bolts to remove the floats, a couple more for the bowls and jets. Two little screws come out of the throttle shaft allowing removal of the butterflies and shaft.

Everything gets a thorough soak in the bucket of death cleaner. Seriously, only use in a well ventilated environment. After a thorough wipe-down and a bit of polishing the exteriors with some steel wool, I got to rebuilding. I found my carb kits have an extensive selection of gaskets and seals, and my carbs themselves use perhaps four of them (actually, I needed six, but there was only one set of exhaust flange gaskets instead of the needed two). I went ahead and replaced what I had: needle valves in the float bowls, float bowl gaskets, dashpot damper gaskets.... I suppose that was it. The carb kits didn't seem to have quite the right air filter gasket either.

First issue: One of the jets has a cracked throat. This may have been why the car was parked, since there's no way to accurately meter the fuel. There's also chance that the little bronze throat got sucked into the engine and wreaked all sorts of havoc, but we're thinking happy thoughts. Of course, my carb kit doesn't have the jets. Luckily, proper SU branded kits are available through the current owner of the branding: Burlen. Now comes another two week wait for that to ship from England... Cheeky Brits...

In the meantime, let's put a better bandaid on that hole in the exhaust:
Only the best for my cars
That should do for now.

We Live Again!

The SU repair kit arrived and, strangely enough, has exactly the parts I would have needed in the first place with no extraneous gaskets or seals. Live and learn. I'll keep the gaskets for later since I just need the jets right now... New jets require re-centering the needle and jet. If the needles aren't perfectly centered, they'll rub on the jet throat, both ruining the fuel metering and rapidly increasing the wear on the needle and the jet. This means loosening and tightening the bolt that holds the jet to the bottom of the carb body over and over again until you can drop the piston and have it land with a "thud." Yes, that is the technical description of how to perform this vital task.

Needles centered, let's bolt it back together! But wait, there's another issue. For some reason, the prior owner had the throttle linkage so loose that it bound up on itself and wouldn't allow the throttles to close all the way. Perhaps they were trying to adjust the idle... A shot of PB-Blaster and some vise grips to loosen those rusty nuts and we're (finally!) back in business.

One final step - those dashpots need oil. The oil serves two purposes: 1) provide damping for the pistons to keep them from bouncing all over the place, 2) provide lubrication for the pistons which would otherwise be metal on metal against the dashpot covers. There is no consensus on what to oil to use here. All the internets tell me is "don't use water." Proper SU branded dashpot oil is available, but folks with these motors use everything from 5wt suspension damping oil to 20wt. Many recommendations I saw were for automatic transmission fluid (ATF), which I happen to have! Here's another valuable lesson, boys and girls, always read the label on that little blue bottle so you don't fill your dashpots with 30wt oil. Yeah, that'll pretty much keep em from moving...

There's still a lot of tuning to do. I'll need to check the valves and timing, then do an actual carb tune which I may even write up!

In the meantime, enjoy some sweet music: